
Leak-Off Test (LOT) – A Practical Field Guide for Drilling Operations
This guide provides a field-focused, operationally practical explanation of how Leak-Off Tests (LOTs) are planned, executed, interpreted, and applied during drilling operations for drilling engineers, supervisors, wellsite leaders, and rig personnel who rely on LOT data to make safe and defensible decisions for the next hole section. The content reflects common industry practices, using clear, practical language suitable for field application.
What Is a Leak-Off Test (LOT)?
A Leak-Off Test (LOT) is a pressure integrity test performed to determine the strength of the open formation immediately below a newly set casing shoe. The test establishes the pressure at which the formation either begins to accept fluid through existing permeable pathways or initiates a fracture.
During the test, the well is shut in and drilling fluid is pumped into the wellbore at a slow, controlled rate. Surface pressure is increased gradually and monitored closely. At a certain pressure, the pressure–volume response deviates from linear behavior, indicating leak-off into the formation.
In practical drilling terms, the LOT provides a direct measure of formation fracture resistance at the casing shoe and is used to define safe operating limits for mud weight, well control pressures, and subsequent drilling operations.
Key Questions Answered in This Article
When should a Leak-Off Test be performed, and when can it be omitted?
How is a LOT executed step by step at the rig site?
What preparations are critical to obtaining reliable LOT results?
What precautions should be taken to avoid misleading or unsafe outcomes?
How should LOT data be interpreted for well control, mud weight design, and MAASP?
Why are some LOT results unclear or non-conclusive, and how should they be handled?
When Is a Leak-Off Test Carried Out?
Mandatory Timing
Leak-Off Test (LOT) is typically performed:
After running and cementing a casing string
After drilling out the casing shoe and cement
Once a short interval of new formation (typically 3–10 m) has been drilled below the shoe
Before drilling ahead into the next hole section
Operational Objectives and Uses of LOT Data
LOT data serves multiple drilling and subsurface objectives, including:
Determining formation fracture resistance and converting it to the maximum allowable mud weight
Assessing whether the casing shoe requires remedial cementing or a squeeze job
Estimating the minimum horizontal stress at the casing shoe
Reducing the risk of lost circulation events in the next hole section
Providing calibration points for fracture gradient estimation over the entire well
Supporting wellbore stability and geomechanical calculations
Supplying input data for waste disposal or downhole injection design
Supporting fracture stimulation, completion, and reservoir development planning
2. Preparatory Steps Before Conducting an LOT
Proper preparation is essential to ensure that LOT results reflect formation behavior rather than equipment limitations or procedural errors.
2.1 Well and Equipment Preparation
Confirm that the cement has reached sufficient compressive strength (typically verified by WOC time and lab data)
Drill out cement, casing shoe, and float equipment completely
Drill a short interval of new formation below the shoe to expose intact rock
Circulate the well clean and ensure no cuttings are present and condition the mud
Verify that the wellbore is static and free of gas
2.2 Pressure Integrity Checks
Pressure test casing, wellhead, BOP stack, and surface lines prior to LOT
Ensure pumps, gauges, and pressure recorders are calibrated and functional
Confirm no leaks in surface equipment or connections
2.3 Fluids and Pumping Setup
Use the active drilling fluid system at the planned mud weight
Line up slow-rate pumps capable of controlled pressure increases
Establish a consistent pumping rate (commonly 0.25–0.5 bbl/min)
3. Step-by-Step Procedure for Conducting a Leak-Off Test
Visual Reference: Pressure–Volume Response During an LOT
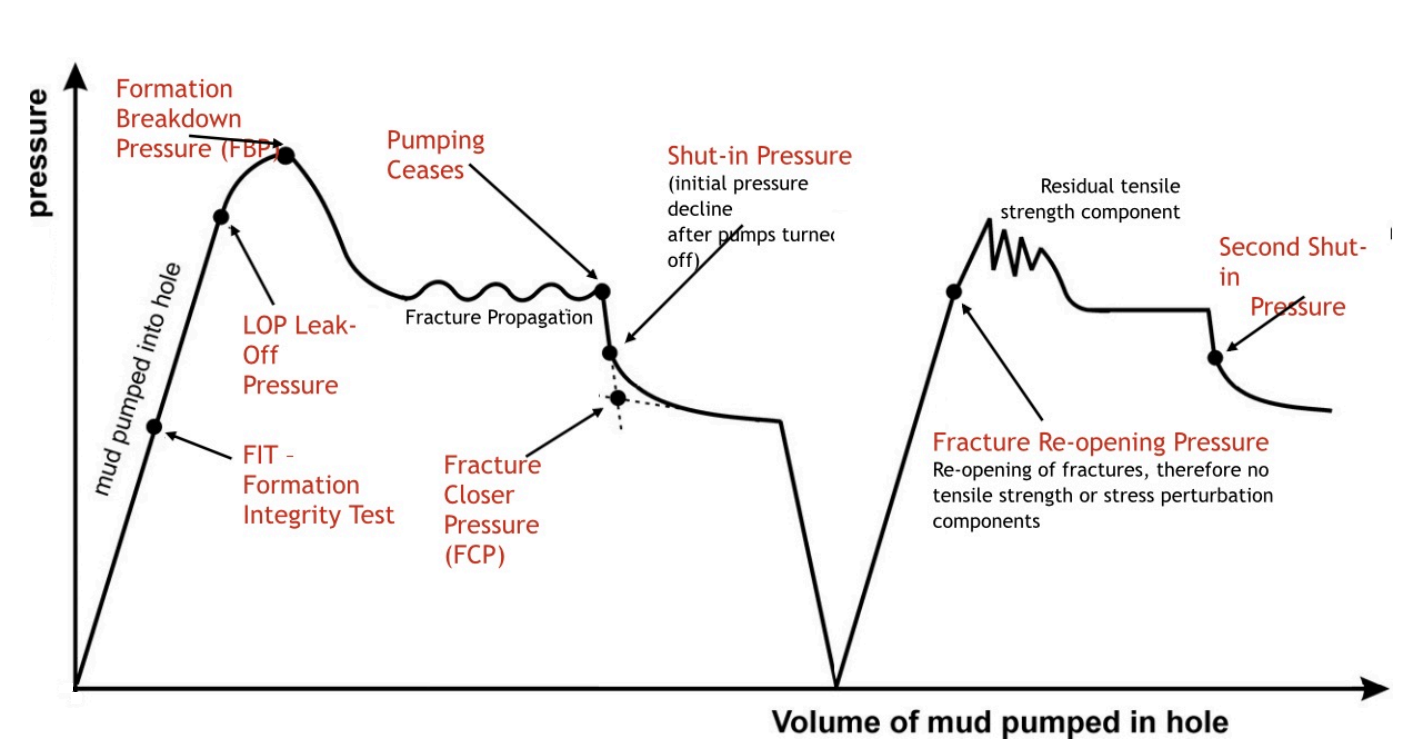
Figure: Conceptual pressure–volume response during a Leak-Off Test. This schematic is illustrative and intended solely for training and interpretation.
The figure above shows the typical pressure response observed while pumping into a closed well during an LOT. Each stage corresponds to a distinct physical process in the wellbore–formation system.
3.1 First Pressurization Cycle – Leak-Off Identification
Prior to pressurization, the well is closed in with all returns shut off, ensuring pressure buildup occurs only through controlled pumping into a closed system.
Step 1: Elastic Pressurization (System Integrity Phase)
Pumping begins at a slow and constant rate
Pressure increases linearly with injected volume
Response reflects compression of drilling fluid in casing and the wellbore system
No fluid loss to the formation occurs at this stage
This region confirms the integrity of surface equipment, casing, and cement.
Step 2: Formation Integrity Confirmation (FIT Range)
Pressure continues to rise in a near-linear manner
The formation below the shoe remains intact
If pumping is stopped after reaching a pre-determined pressure, the test effectively becomes a Formation Integrity Test (FIT)
NOTE: No leak-off has occurred at this stage. If the objective of the test is limited to confirming formation integrity up to a predetermined pressure (Formation Integrity Test – FIT), pumping shall be stopped upon reaching the planned test pressure. The well shall then be shut-in and pressure observed for stability. No further pressurization shall be carried out, and the test shall be considered complete once integrity at the specified pressure is confirmed.
Step 3: Leak-Off Onset (LOT Point)
Pressure–volume response deviates from linear behavior
Additional pumped volume results in disproportionately smaller pressure increases
Indicates that the formation is beginning to accept fluid through pores, natural fractures, or newly initiated fractures
NOTE: The pressure at this deviation is recorded as the leak-off pressure. If the objective of the test is to establish the formation leak-off pressure, pumping shall be terminated immediately upon identification of deviation from linear pressure response. The recorded pressure at this point shall be taken as the leak-off pressure. No further pressurization is required for standard LOT objectives.
FIT objectives stop at the planned pressure limit. LOT objectives stop at the first indication of leak-off.
Step 4: Fracture Propagation (If Pumping Continues)
Continued pumping after leak-off leads to fracture opening or extension
Pressure may stabilize or decline slightly as fluid is lost into the formation.
This phase is not required for standard LOT objectives and is often avoided
Step 5: Shut-In and Pressure Decline Response
Pumps are stopped, with the well remaining shut-in
Pressure declines as fractures close and fluid leak-off stabilizes
The pressure trend during shut-in can provide qualitative insight into fracture behavior
After sufficient shut-in observation, the well is gradually opened to the active system, allowing surface pressure to bleed off to zero.
During a Leak-Off Test, the primary diagnostic is the pressure–volume trend rather than a strict material balance. Unlike casing pressure tests or Formation Integrity Tests, an LOT does not require reconciliation of pumped and returned volumes, as the well is shut in and controlled leak-off into the formation is expected. The test is terminated once a deviation from linear pressure response is observed to avoid unnecessary fracture propagation.
3.2 Optional Second Pressurization Cycle (Fracture Re-Opening Behavior)
After completion of the initial leak-off cycle, the well may be depressurized and allowed to stabilize before any further pressurization is considered. A second pressurization cycle is not a standard requirement for a Leak-Off Test and shall only be performed when specifically stated in the well program and approved by the drilling supervisor.
If conducted, the second cycle involves re-closing the well and slowly re-pressurizing the wellbore at the same controlled pump rate used during the initial test. The pressure at which a previously initiated fracture reopens is typically lower than the original leak-off or breakdown pressure, as near-wellbore tensile strength and stress-concentration effects have already been overcome during the first cycle.
Pressures observed during this second cycle represent fracture re-opening behavior, not formation fracture initiation. These values shall not be used to redefine the fracture gradient, maximum allowable mud weight, or MAASP for drilling or well control purposes.
Unless the test objective includes geomechanical characterization, injection design, or fracture diagnostics, additional pressurization beyond the initial leak-off point is discouraged. Re-pressurization may further weaken the casing shoe formation and reduce the available pressure margin for subsequent drilling operations.
For drilling design and well control calculations, the leak-off pressure identified during the first pressurization cycle remains the governing limit.
4. Interpretation and Application of LOT Results
The value of a Leak-Off Test is realized through the correct interpretation and disciplined application of the results to drilling and well-control decisions. LOT provides a direct calibration point for formation strength at the casing shoe and defines the upper pressure boundary for the next hole section.
The primary parameters derived from an LOT include the surface leak-off pressure, the corresponding fracture or near-fracture gradient at the casing shoe, the maximum allowable mud weight, and the Maximum Allowable Annular Surface Pressure (MAASP). Together, these parameters define the maximum hydrostatic and surface-applied pressures that can be safely imposed without risking formation breakdown or losses.
For the LOT result to be representative, the test should be conducted with well-conditioned mud. Mud properties such as density, rheology, and compressibility directly affect the pressure–volume response. Performing an LOT with unconditioned mud, spacer-contaminated fluid, or a different mud weight can lead to misleading results.
Operationally, LOT data is used to confirm or revise the mud weight program, define safe shut-in pressures during kick situations, evaluate the adequacy of casing setting depth, and support real-time well control decisions.
Worked Example: Converting LOT Pressure to EMW and MAASP
Assume the following conditions:
Casing shoe TVD: 3,000 m
Mud weight during LOT: 1.30 sg (10.85 ppg)
Recorded surface leak-off pressure: 4,000 kPa
Equivalent Mud Weight (EMW) at the casing shoe:
EMW = Existing mud weight + (LOT surface pressure ÷ (0.00981 × TVD))
EMW = 1.30 + (4,000 ÷ (0.00981 × 3,000))
EMW ≈ 1.30 + 0.14 = 1.44 sg (≈ 12.0 ppg)
This EMW represents the near-fracture limit at the casing shoe. The MAASP for well control operations is then determined by subtracting the planned mud column hydrostatic pressure from the fracture pressure at the shoe, and applying appropriate safety margins per operator policy.
5. Practical Use of LOT Data in Drilling Operations
LOT results are applied directly to both well-planning and real-time operations. Key practical uses include:
Confirm or revise mud weight programs:
The fracture limit derived from the LOT is compared against the planned mud weight for the next hole section. If the margin between pore pressure and fracture pressure is narrower than expected, the mud program may need to be revised to avoid approaching formation breakdown while still maintaining adequate well control.Define safe shut-in pressures during kicks:
LOT data is used to establish the Maximum Allowable Annular Surface Pressure (MAASP). This ensures that surface pressures applied during well shut-in or circulation do not exceed the casing shoe integrity limit, reducing the risk of inducing losses or underground flow.Evaluate casing setting depth adequacy:
The LOT provides a direct check on whether the selected casing depth provides sufficient fracture resistance for the next hole section. Low LOT values may indicate the need for an additional casing or liner string.Support real-time well control decisions:
During drilling and well control events, LOT-derived pressure limits provide clear operational boundaries, enabling informed decisions on circulation pressures, choke management, and allowable surface pressure.6. Precautions and Best Practices During LOT Execution
To obtain reliable and defensible LOT results, the following best practices should be observed:
Never exceed the planned maximum test pressure:
Pressurizing beyond the planned limit can permanently weaken the formation at the casing shoe and invalidate the test by inducing unnecessary fracture propagation.Avoid high pump rates that mask leak-off behavior:
Pumping too fast can delay recognition of the leak-off point due to frictional losses and system elasticity, resulting in an overestimated formation strength.Do not perform LOTs with unstable wellbore conditions:
Hole instability, pack-off, or trapped gas can distort the pressure response and create unsafe test conditions, leading to misleading results.Ensure cement quality is not mistaken for formation strength:
Pressure losses due to poor cement bonding, micro-annulus, or shoe-track leakage can resemble formation leak-off and must be identified before accepting LOT results.Maintain clear communication between driller, company representative, and mud logger:
Continuous alignment on pump rate, pressure trends, and decision points is essential to correctly identify leak-off and terminate the test at the appropriate time.7. Special Scenarios Where LOT Results May Be Unclear
Certain subsurface or operational conditions can lead to ambiguous LOT responses:
Cement or shoe failure:
If pressure leaks through poor cement or a micro-annulus rather than into the formation, the pressure decline may be sudden and non-linear. Such behavior can result in misleading LOT values, and further evaluation or remedial cementing may be required.Naturally fractured or vugular formations:
In carbonates or depleted reservoirs, leak-off may occur at relatively low pressures. The response may reflect fluid entry into existing fractures rather than fracture initiation, and conservative interpretation is recommended.Permeable sands below the shoe:
Gradual pressure loss without a clear fracture signature can make it difficult to distinguish true leak-off from filtration losses. In these cases, a FIT or step-rate test may provide more meaningful confirmation of integrity.Temperature and fluid effects:
Cold drilling fluid in deep wells can mask early leak-off, while fluid compressibility and surface system elasticity can delay or smooth pressure response. Adequate stabilization time between pressure increments is essential.8. How to Draw Conclusions in Unclear Cases
When LOT results are not definitive, the following approach should be applied:
Compare LOT data with offset well results:
Reviewing regional fracture gradients and offset LOT data helps place the result in a proper geological and operational context.Review pressure–volume trends rather than single values:
The overall shape and deviation of the pressure curve often provide more insight than a single recorded pressure.Use the lowest defensible pressure as design input:
When uncertainty exists, selecting the most conservative reasonable limit reduces operational risk.Apply safety margins when uncertainty exists:
Appropriate margins should be incorporated into mud weight selection and MAASP calculations to protect casing shoe integrity and maintain well control.
Decision Map: How LOT Results Influence Drilling Decisions
LOT pressure is higher than planned mud weight
→ Proceed with drilling as designedLOT pressure marginally above planned mud weight
→ Reassess kick tolerance and MAASPLOT pressure is lower than expected
→ Reduce mud weight or revise casing programLOT inconclusive or erratic
→ Apply conservative limits and consider repeat testing
Frequently Asked Questions (FAQ)
What is the difference between LOT and FIT?
LOT intentionally pressurizes the formation until leak-off occurs, while an FIT (Formation Integrity Test) only confirms integrity up to a predefined pressure without inducing leak-off.
How much formation should be drilled below the casing shoe before an LOT?
Typically 3–10 m, enough to expose competent formation without risking hole instability.
Can an LOT be repeated?
Yes, but repeated tests may weaken the formation. Repetition should be justified and minimized.
Is the LOT pressure the same as the fracture pressure?
Not necessarily. LOT pressure usually represents near-fracture or initial-fracture opening, not full-fracture propagation pressure.
References:
Bourgoyne, A.T., Millheim, K.K., Chenevert, M.E., and Young, F.S.: Applied Drilling Engineering, SPE Textbook Series, Society of Petroleum Engineers, Richardson, Texas.
Aadnøy, B.S. and Cooper, I.: Advanced Drilling and Well Technology, SPE, 2019.
API RP 59: Well Control Operations, American Petroleum Institute.
API RP 65-2: Isolating Potential Flow Zones During Well Construction.
Mitchell, R.F. and Miska, S.Z.: Fundamentals of Drilling Engineering, SPE.